Wednesday, January 1, 2020

WHAT A YEAR - WITH A RELAXER!!!!

I haven't been psoting natural hair videos or blog posts for a while. Here's part of the reason why...


I got pretty sick at the start of the year and decided to relax my hair - for a while. It was not my best move. I really should have just done a low hairstyle but instead, I relaxed. I just didn't feel confident without hair, given my horrible adult acne. So, after a few months and improving health, this is the transitioning result (about 2 months post relaxer).

My newly transitioning hair in September 2019


Before this, I went through a range of styles, all of which I could never capture here, but I placed a 2-year recap to show some of my length-revealing styles and a couple of protective styles.


2019 Relaxed Styles


2018 Natural Hairstyles


October 2018 - Stretched Puffed out Twist-out

\


February 2018 - Puffy Wash n Go on 4c Hair


August 2018 - French Roll Updo into a Twist-out


October 2017 - Natural cornrows with hair added to back


Sept 2017 - Sept 2018


2016 was about that Tapered Afro life


Well, I'm headed back to square 1 - transitioning all over again. So, obviously, I didn't "Keep It Kinky" before. But, I won't let that halt my goals. The relaxed hair served it's the purpose of giving me a break from any real hairstyling. Hopefully, I will be able to keep up with my natural hair this time around - with good health! Stay tuned.

Wednesday, February 14, 2018

Simple Natural Hairstyle How-To – Transitioning Hair Appropriate

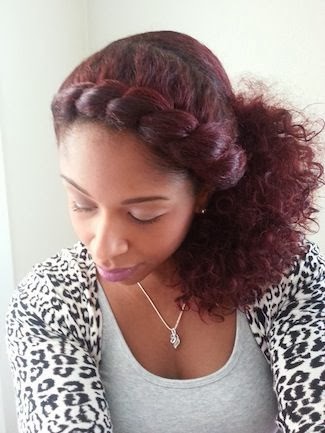
Simple Transitioning or Natural Hairstyle

If you're transitioning to natural hair, it can get very difficult to keep your hair looking neat and camouflaging your curly and straight textures. This hairstyle might help. Why? It helps your scraggly ends to look more full and blend with the texture of your kinks, curls or waves. Bonus, this style could last you years since it can be done on fully natural or fully relaxed hair too.

STEP BY STEP HAIRSTYLE INSTRUCTIONS & TIPS

Best results will be received when hair is prepped/set the night before the style is to be worn.

Step 1
Moisturize and Seal your hair. Always try to work with or only manipulate lightly damp or very moisturised hair as it is less prone to breakage.

Step 2
Loosely detangle or detangle hair with fingers. The more thoroughly you detangle, the smoother the top of your hairstyle will be.

Step 3
Section the front of your hair that you wish to flat twist. Be sure to part one side all the way to the nape of your neck so that it will blend easily into your ponytail at the center back or to the side of the back of your hair. In the pictured style above, hair was parted  from the right ear and curved around near the other ear and then on to the nape of the neck  for a large section.

Step 4
Secure away the back section then flat twist the front section of hair from one side all the way to the nape of the neck and pin to secure. If you don't know how to flat twist, visit this link to learn how – http://tinyurl.com/kpbsdjg

Step 5
Apply a bit of a light holding agent of your choice (like Eco Styler Gel) and then secure the back part of your hair along with the end of your twisted section into a single ponytail. At this point, you may remove the pin that was inserted to keep your twist in tact.

Step 6
Apply a holding agent (like Eco Custard or Cantu Shea Butter For Natural Hair Coconut Curling Cream) to the ponytail. Plait or twist the ends of the hair into about 4-6 sections then wrap them into a bun.

Step 7
Tie hair with scarf to keep the style smooth. Let style set overnight leave the scarf on for for 3-4 hours if you are short on time. Remember - the longer you let the style set, the longer it will last.

Step 8
Remove the scarf and separate the ponytail section. You should have kinks and curls at the end of your hair as pictured above. Manipulate the curls for the desired fullness. Optional – you can also turn this into a big messy bun if you desire a more conservative look.


TIP – Redo the ponytail into 4 large twists and a bun at night to keep the style for another day. Don't forget to tie it down to keep it neat. Apply more gel and gently brush the top of the hair if needed.


Happy styling and Keep it Kinky!

Tuesday, June 18, 2013

Top Bun with a Twist Natural Hairstyle Tutorial

This style is easy and perfect for the summer. Keep reading to see how you can quickly replicate this beautiful natural hairstyle.


How to Create the Style

  1. Secure your hair to the top of your head with a ponytail holder.
  2. Twist the ends of your ponytail into chunky twists.
  3. Pull the hair forward and tuck them under to the front. 
  4. Secure your hair with pins. 
  5. Add gel to the edges and brush lightly. 


Tuesday, June 11, 2013

How to Style Bantu Knots for Perfect At-home Curls

Bantu Knots / Chiney Bumps

Bantu Knots, commonly known as Chiney Bumps in Jamaica, are a well known method for stretching natural hair. As a child, I went through the ritual of getting my hair washed on Saturday mornings then being sent outside to play in the sun while my Bantu Knots dried. A lot of people do not know how to use this method for stretching or even styling here. Keep reading to find out more.

Bhantu Knots parted in grid form

Bantu Knots are also worn a a hairstyle with sometimes intricate or neat grid-style parting as shown above.

The bonus is that once the Chiney Bumps have dried and are removed, you can have a fabulous curly style that should last at least 2-5 days if maintained at night. Just look at the bhantu knot-out hairstyle below then watch the video of the takedown process.


Watch the video below to see the take-down process and results on one woman's hair.


It's all up to you how you use this style. Watch the video at the end of this post to see two techniques for creating bantu knots via video tutorials from YouTube.


TECHNIQUE 1


TECHNIQUE 2


Don't forget to read the latest issue of KiK Magazine and subscribe to our email list.

Friday, June 7, 2013

The Baggy Method for Intense Deep Moisture Conditioning

Dry hair? Try the baggy method to infuse some major moisture into my hair.

Ponytail baggy method on natural hair

What is the Baggy Method?  This is the process of deep conditioning  one's hair in a "bag" for intensive deep conditioning. You can also only baggy the ponytail. This is known as the ponytail baggy method. Both are done in a similar way. How is the baggy method done?


Step 1
Mist or wet hair with water. I believe that this adds moisture to the hair and loosens up the product that may already be on the hair.

I use Aphogee Two-Sep Protein Treatment and Shielo Vibrancy Conditioner

Step 2
Add a conditioner of your choice. This would be a protein conditioner (if your hair is tearing, being mushy and stretchy) or a moisture conditioner (if your hair is dry and brittle).

Not sure which one you need? Add both!

Optional – add oil something like castor oil or extra virgin olive oil to  the moisture conditioner.

Note Well – Avoid putting the conditioner on your scalp to reduce possible itching.


Step 3
Put a plastic cap or you can even tie a plastic shopping bag over your hair.  You can use the baggy method for just your ponytails to treat your ends or over your entire head.  Use small bags/caps for ponytails. I recommend squeezing all of the air out so that you bag don't pop open if you roll over on it when sleeping.

Source – http://www.thelollipopshoppe.co.uk


Step 4
Secure the cap on with hair pins or my favourites - headbands, scarfs or hair ties.

Source – http://www.jonah33.com

Step 5
Leave this on over night or for at least a couple of hours for best benefits. The longer you leave it on, the more likely you are to have good results. Wash hair as usual in the morning.

Ponytail baggy method on natural hair

Some people do this and wear their hair out with a tam on top. I did this once in the winter but the sound of the plastic bag drove me crazy and I felt like an idiot. #I'mjustsaying. Do as you like. Ideally, you can do this on a Friday or Saturday night then wash your hair first thing in the morning.

Tuesday, May 14, 2013

2 Graduation Hairstyles for Locked and Loose Naturals


Congratulations graduates! You have hit  and crushed a milestone and you have to look great for your big day. If you are on a budget, here are ideas and tips for loose/free naturals as well as another for the locked ladies out there. Try one of the styles using the natural hair tutorials below.


Wednesday, April 3, 2013

How to Create Clip In Highlights For Natural Hair

Source


Are you afraid of the possible damage from colouring your hair? Maybe you just like to switch things up on a regular basis. Whatever the case, you can instantly get the look of subtle or dramatic change in the look of your hair. Just check out the video below courtesy of Long Hair Don't Care LLC on YouTube below.


Thursday, March 21, 2013

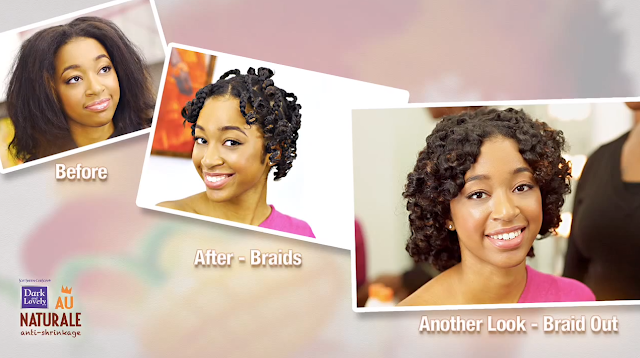
How to Create a Perfect Braid-out on Transitioning Hair

Transitioning to Natural Hair – Perfect Braid-out Hairstyle 
You don't have to add damaging direct heat to your hair in an effort to blend your relaxed hair with your new growth. This natural hairstyle was created on hair that has 6 months of new growth.

The curls were created by:

  1. Washing the hair
  2. Detangling with a wide tooth comb
  3. Plaiting the hair into small sections
  4. Curling the hair on perm rods
  5. Allowing to fully dry
  6. The adding a light oil like coconut oil liberally before taking down the curls and plaits


Here are the culs that you could get from this type of set.


Now watch the video below for a visual step by step tutorial and try this style for yourself.


Sunday, March 17, 2013

How to | Natural Looking Marley Braids

Marley Braids Extensions Hairstyle (Source)


If you long for long, natural hair, fake it with these marley braids extensions. You can also do the shorter version if you just want the look of full, short natural hair too. I've been planning to do this style for some time and finally found a clear tutorial that will make me very confident in my technique.

Model wearing Marley Braids Extensions Hairstyle (Source)


Tip!
Twist the extension in from the root for the natural, seamless integration of the hair. It looks a lot more natural than braiding the root. You can use your select type of braiding hair. IF the hair used is straight, you may need to curl the ends for a more natural look. Look at the tutorial below to learn the best technique for natural-looking hair installation. 


Wednesday, March 13, 2013

Natural Hair Advice from Trudy-Ann of Curly-Centric Jamaica

Trudy-Ann Hylton of Curly-Centric Jamaica with Diedre Callam of KiK Magazine

I caught up with Trudy-Ann Hylton of Curly-Centric Jamaica and asked her about her hair, Curly-Centric and her best advice for transitioners. Watch the video interview below or keep reading to to see what she had to say about transitioning.


Trudy-Ann's Advice for Transitioning to Natural Hair
  1. Deep Condition. Deep Condition. Deep Condition. Take as much care as you can because your hair is very vulnerable at the point of demarcation (where your new growth meets your relaxed hair)
  2. Protective Styling. Protective styling means leaving your hair in a safe hairstyle (one where your ends are protected like braids extensions or cornrows) for days at a time to minimise the manipulation and possible breaking of the hair
Trudy-Ann's Top 3 Products
  1. Eco Styler
  2. Pantene Pro V Relaxed and Natural Conditioner
  3. Coconut Oil
Connect with Trudy-Ann at facebook.com/curlycentric.